Anatomy of a Human Design Chart & What Each Part Can Tell You

The Tenth House / Articles / Human Design
Anatomy of a Human Design Chart & What Each Part Can Tell You
Your Human Design chart is your energetic blueprint and personal user manual for how you were designed to operate and interact in the world — but like any blueprint or instruction manual, it helps to know what you’re looking at, and where to start. There’s a lot of information on your Human Design chart, and it can be really overwhelming at first — like trying to read in a different language, so this article will give you an introduction to each element of a Human Design chart so that you know what information you can get from where.
PS: If you haven’t already generated your Human Design chart, you can do it here.
General Overview
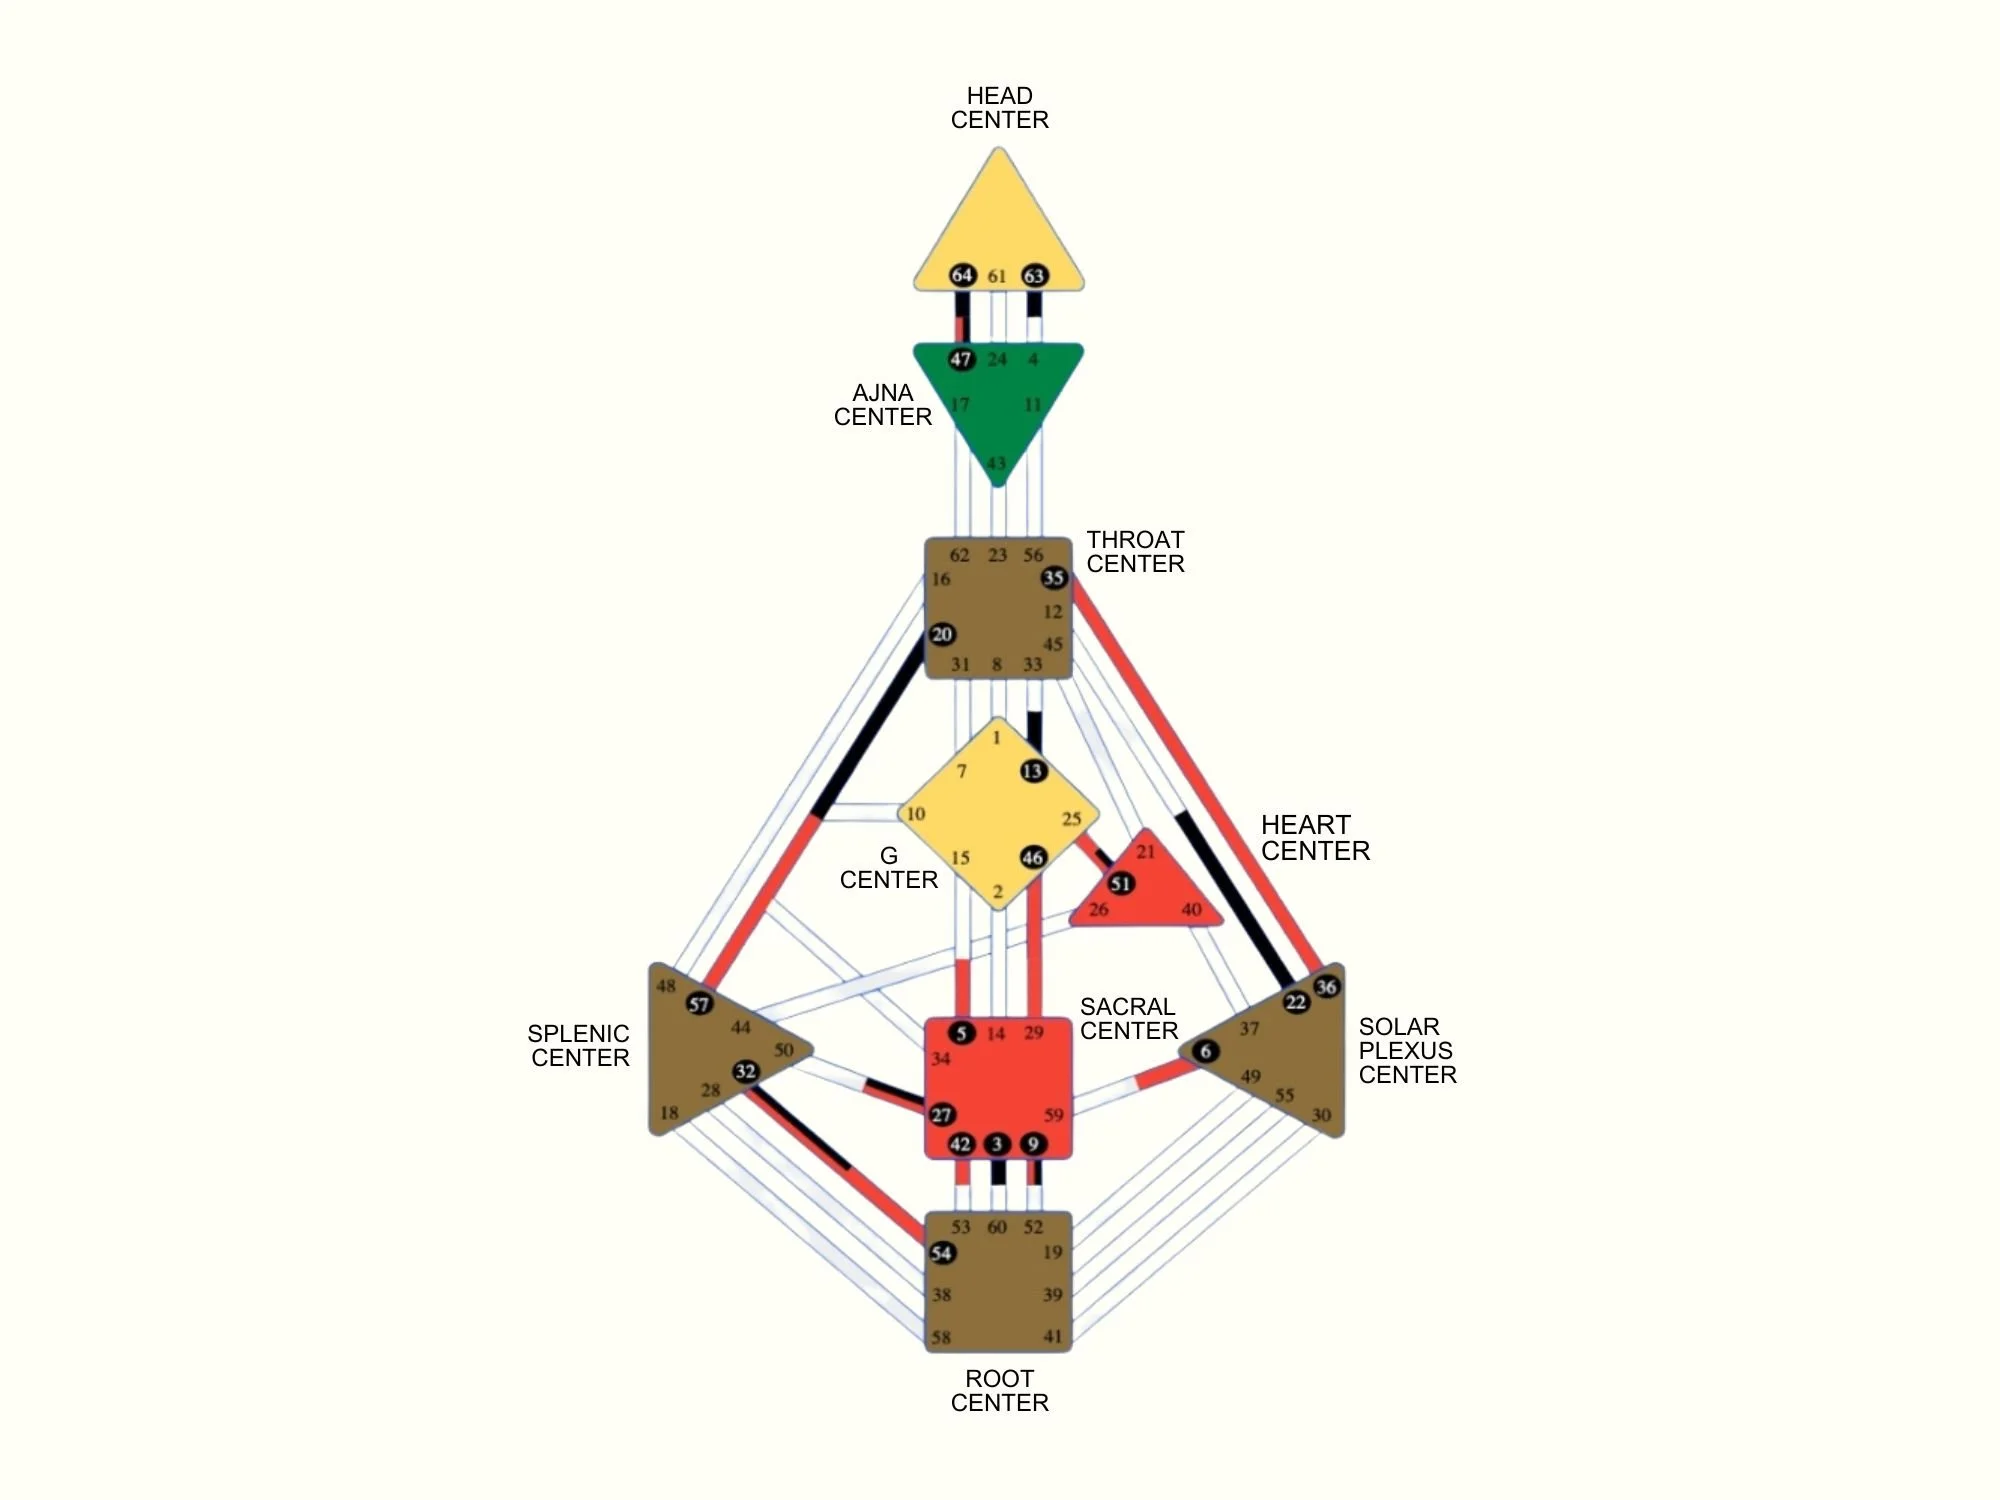
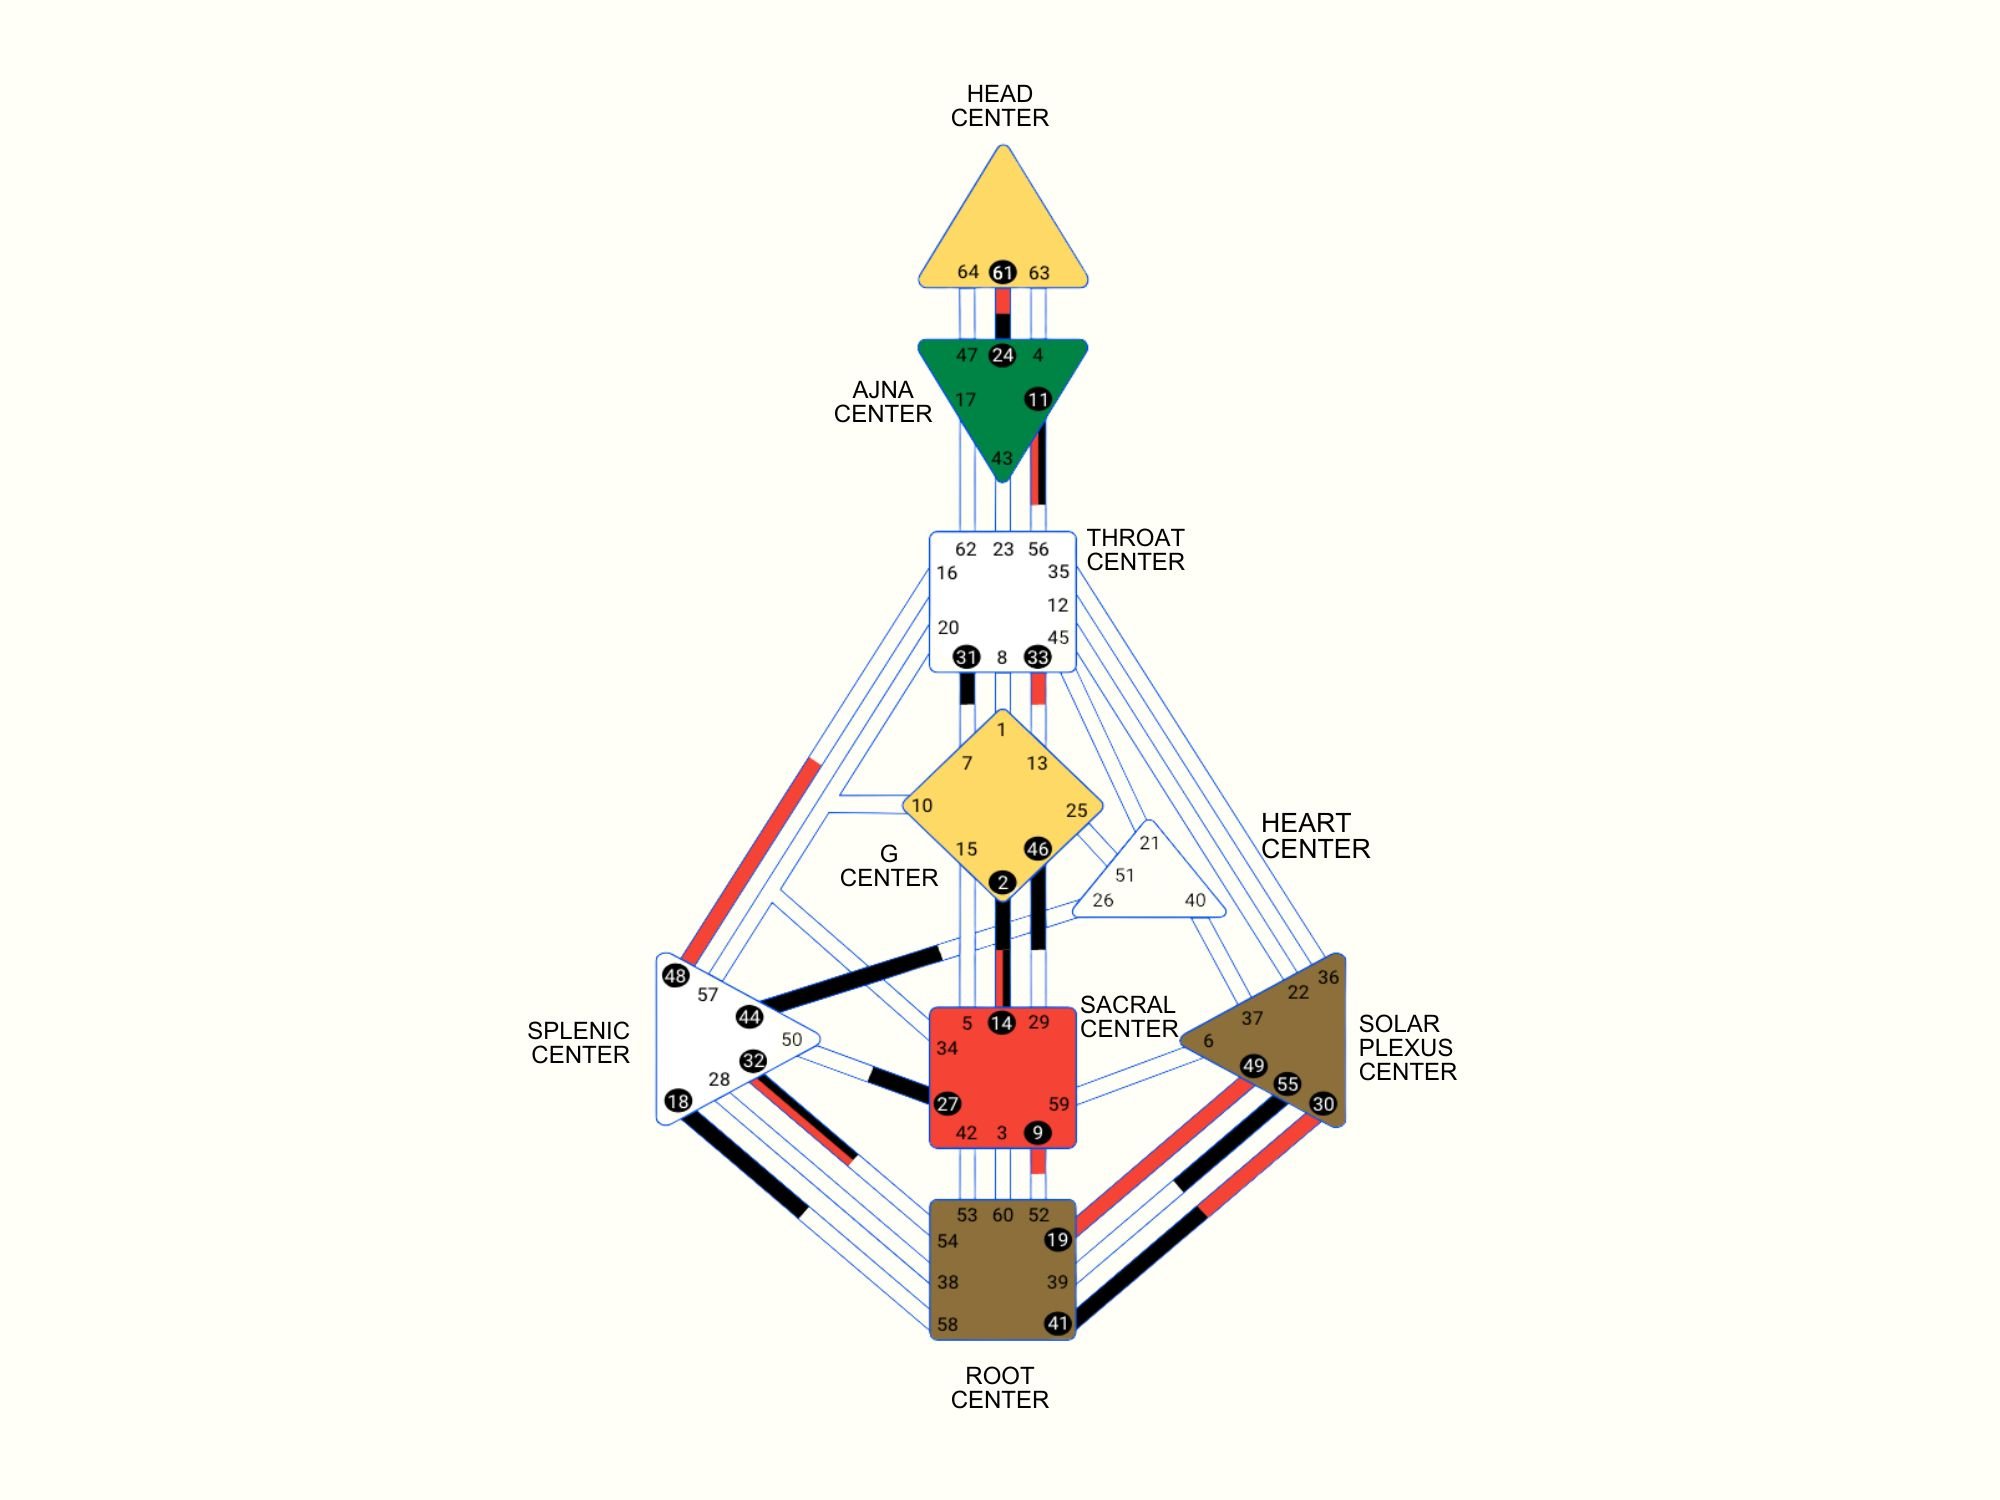
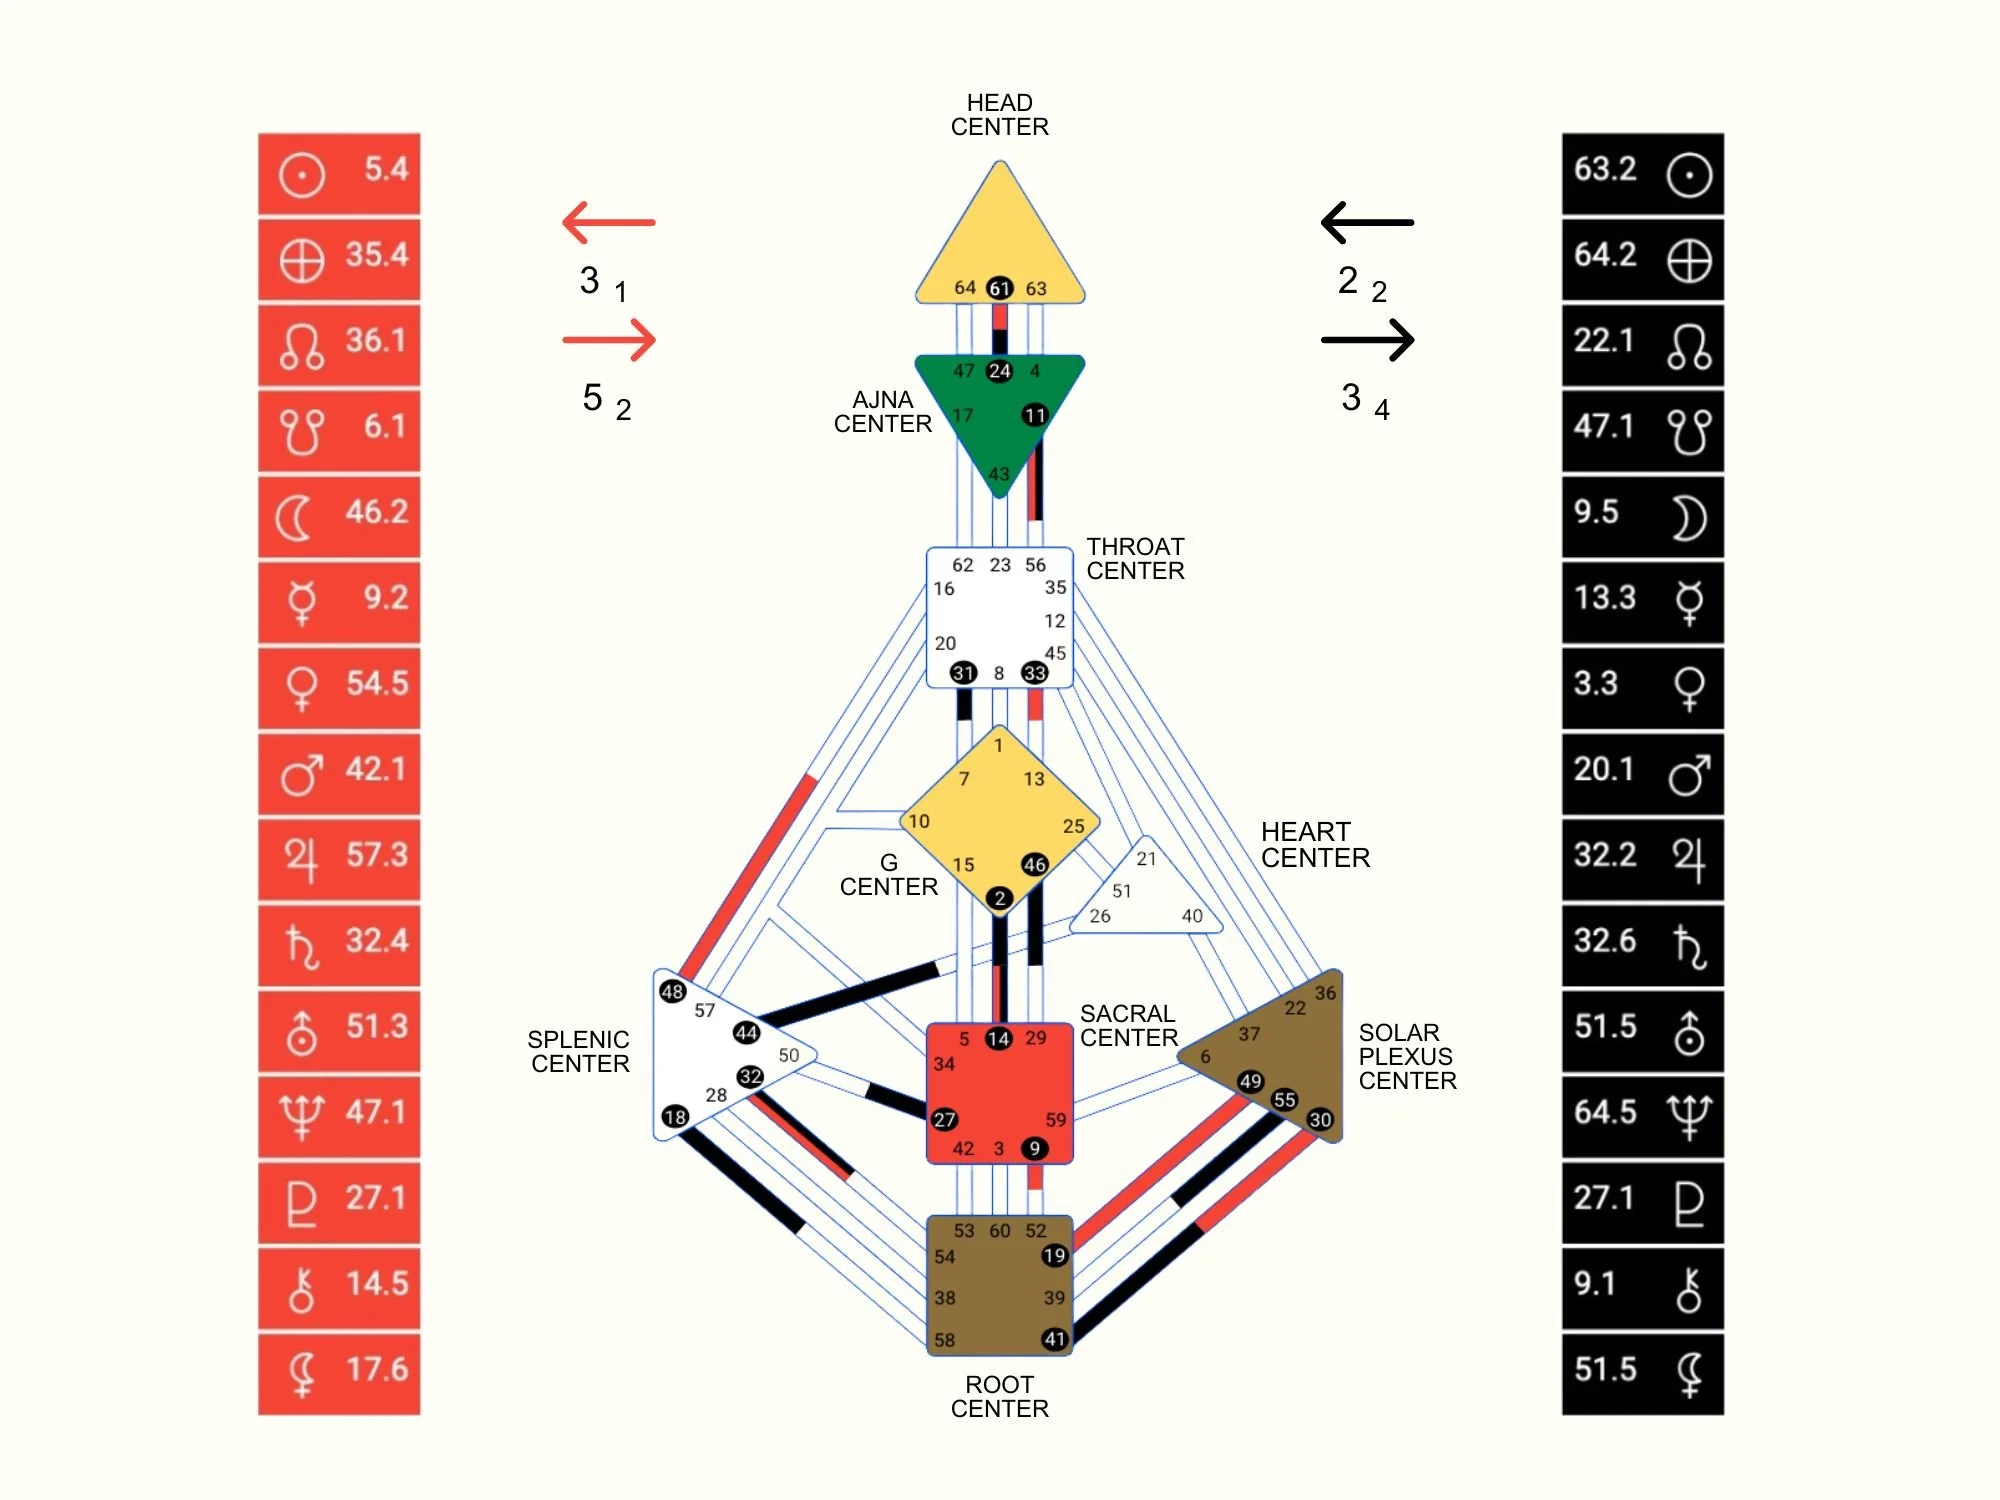
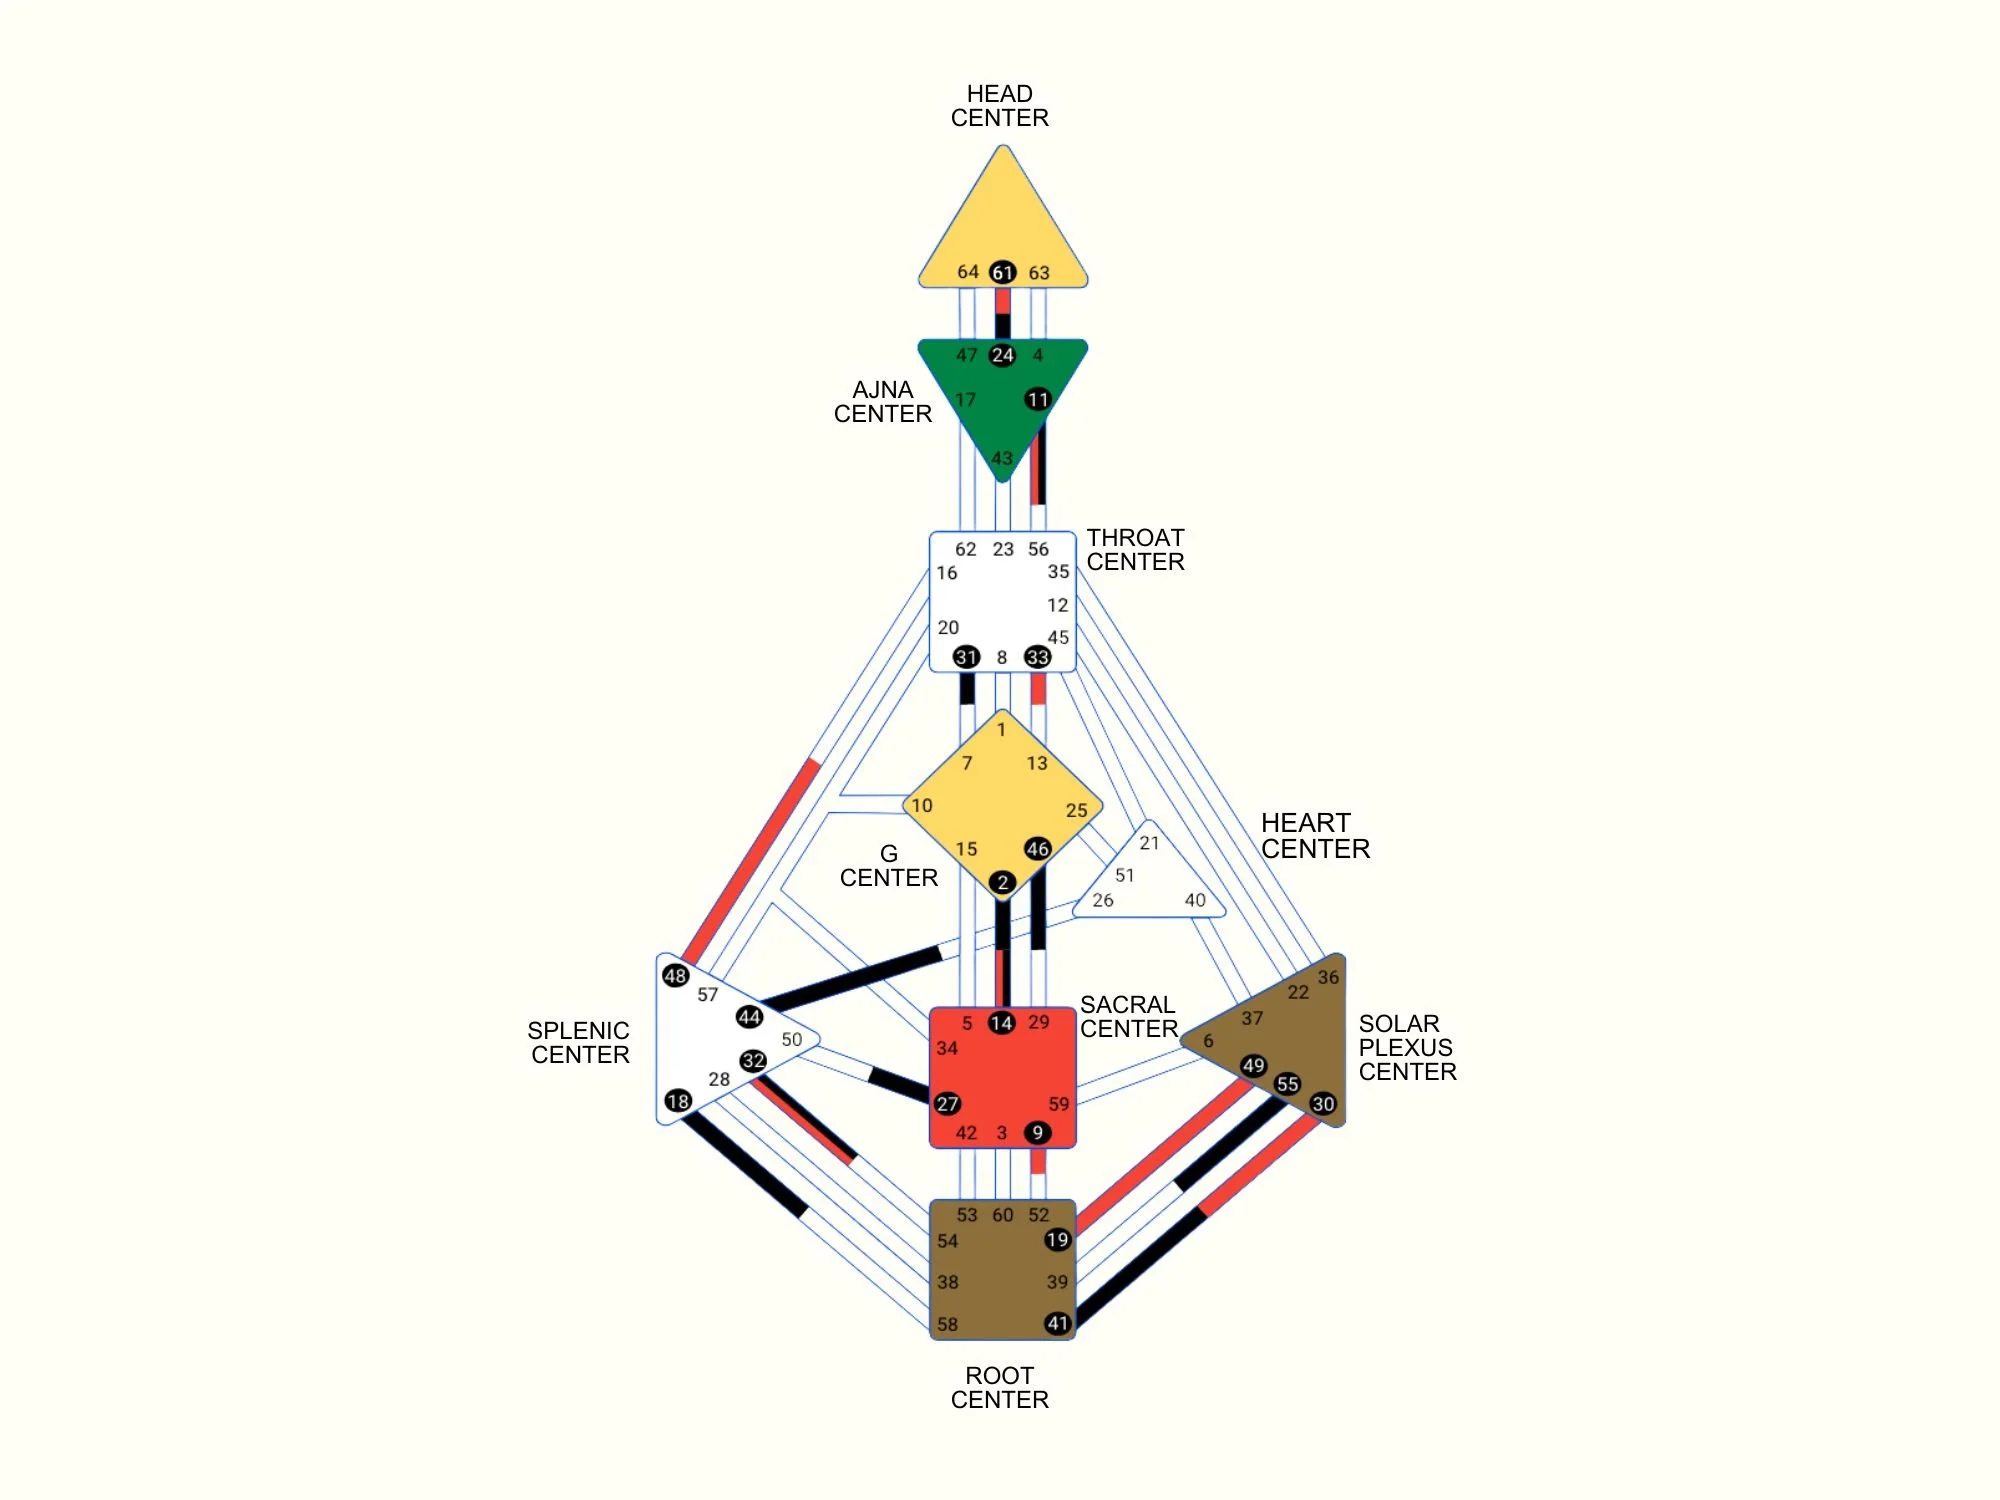
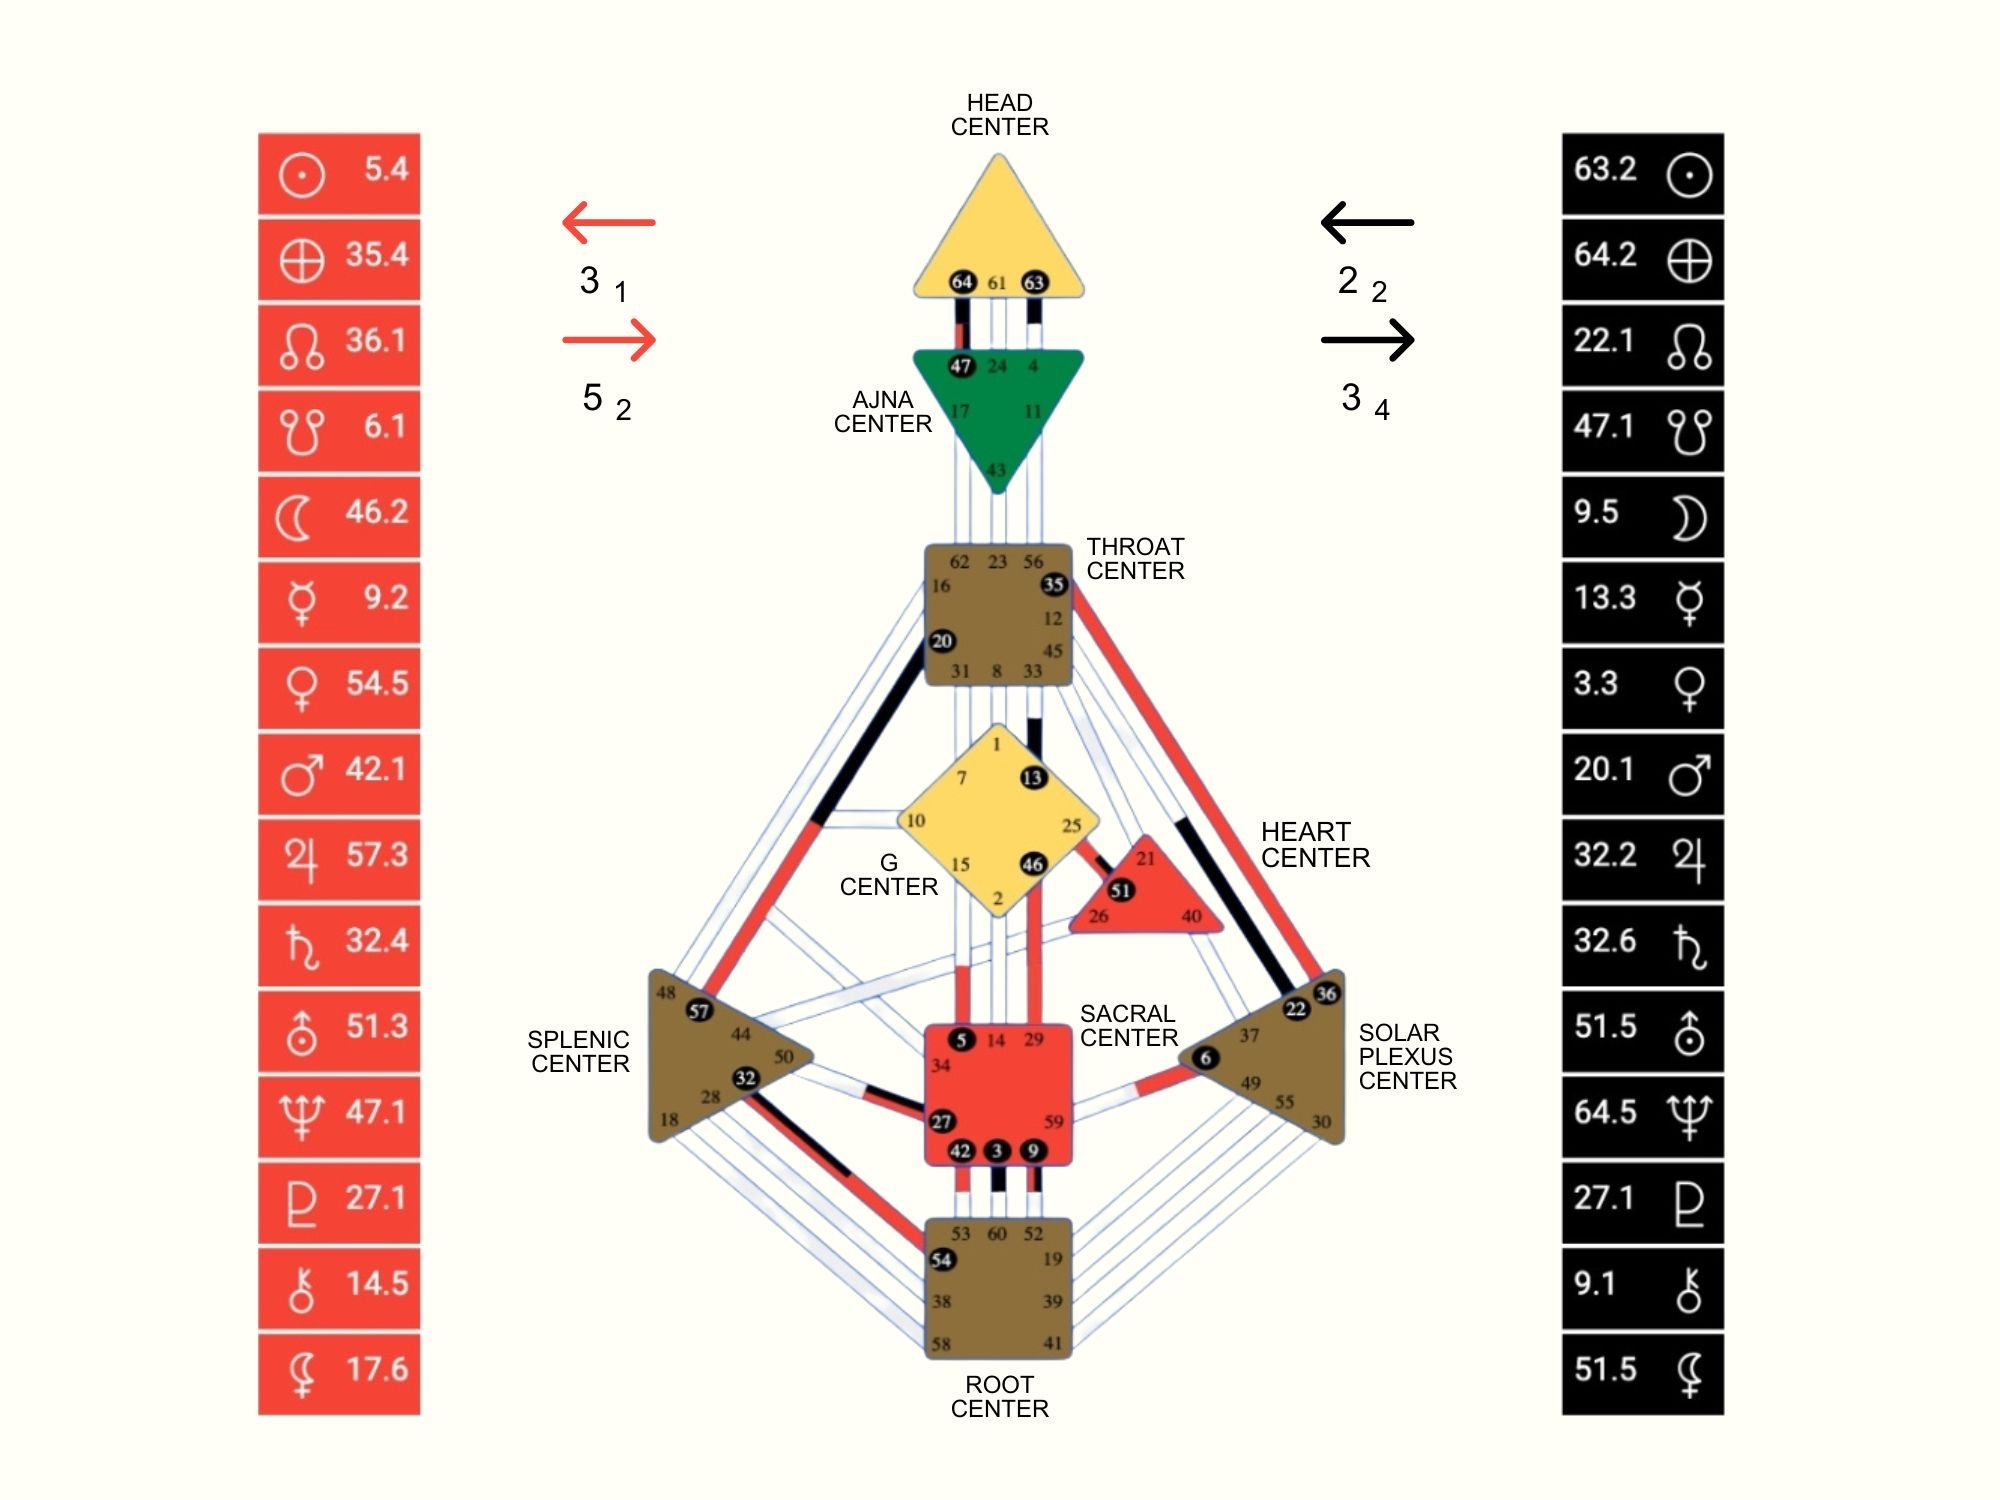
Every Human Design chart has the same framework or layout of shapes with numbers in them that are connected by lines, four arrows, and a column or list of planet symbols and numbers on the right and left of the shapes and lines — but each chart will have different numbers beside the planet symbols, each chart will have the arrows pointing in different directions (either right or left), and each chart will have some, none, or all of its shapes and lines either filled in with a colour or left blank or white.
The shapes and lines in the center of the chart make up what is called a BodyGraph, the four arrows at the top of the BodyGraph represent what are called Variables, and the two columns of planet symbols and numbers are a simplified representation of what position the Sun, Moon, nodes of the Moon, and each planet was in at two very specific moments in time. This planetary data is used to determine the direction of your Variable arrows, as well as which lines and shapes will be coloured-in on your BodyGraph.
Generally speaking, the coloured in areas on your BodyGraph show your true solid consistent natural programming that I was talking about, and the areas of your BodyGraph that are left blank or white are where you are open or have space to take in outside energy and conditioning.
It’s important to note that when it comes to parts of your BodyGraph being coloured in or left blank, one is not better than the other — they simply have different functions within your design.
Coloured-in Areas
The areas of your chart that are coloured in are referred to as your definition, and these defined areas are where you received permanent activation from the sun, moon, nodes of the moon, and planets during your development in utero and at the time of your birth. This means that you will be constantly experiencing the energy of that area throughout your life, and you can trust and depend on this energy to be a consistent part of your personality and the way that you function. Your definition is your solid and stable core, and the potential that you can grow into as you fully embrace and embody your design. Your definition is also what determines your Type, Strategy, Authority, and Profile, which are the first 4 things that I recommend practising in order to live your design. You can think of your defined areas as musical instruments that are permanently hardwired into your form, where the sound that comes from these instruments is constantly heard and felt by you, but is also radiating out to be received by others.
White or Blank Areas
The areas of your chart that are white or left blank are referred to as undefined or open. These areas are where you were not activated by the sun, moon, nodes of the moon, or planets during your development in utero or at the time of your birth, and so you do not have the energy of those areas as a permanent, fixed, or consistent part of your human experience. Instead, these areas are where you are open to receive, sample, and experience energy from outside sources, like when the planets temporarily activate you as they move through the sky, or if someone comes within about 6 feet of you and radiates their definition into your aura. You can think of your undefined or open areas as amplifiers. They are not a source of sound, but they can plug into a sound source, hold it, experience it, and amplify it out louder than it came in.
Undefined/open areas are useful in so many ways. Just like music amplifiers, they can allow people to become aware of sounds that might not otherwise be noticed, and they are also portals through which we can become aware of, empathetic to, and wise about the world around us. Because of this, the openness in your Human Design chart shows you what you came to learn about in this lifetime. Undefined and open Centers are also the places where we can easily be conditioned by the energy around us, and identify with things that are not actually part of our authentic Self, therefore creating layers of Not-Self stuff that cover your authentic self. To learn more about the ‘Not-Self’ in Human Design, read this article.
Just to be super clear, the open Centres on your BodyGraph are not necessarily or automatically your Not-Self. Your open and undefined Centers are simply innocent parts of your nature that are the most vulnerable to conditioning. They are your true gifts and opportunity for wisdom, and can also easily become your wounds.
Your Not-Self is actually a dysfunctioning of ALL your Centres (not just your open Centers). How it generally works is that your open Centers get trained to behave as if they were defined, and your defined Centers experience the resistance that comes from trying to live what you are not. For example, if someone has an undefined Throat Centre and a defined Emotional Solar Plexus Centre, they may try to attract attention because that is the Not-Self strategy of an undefined Throat, but they will experience the resistance that comes from that in their emotions because that is where they are defined.
The Red & Black
As we have just established, there is meaning behind different parts of your chart being either coloured in or left blank, but some of the specific colours that are used on a Human Design chart and BodyGraph are also significant. Starting with the shapes on your BodyGraph, which are called Centers, if those are defined, they will be coloured in with a specific colour depending on the shape, so each shape has one colour that it will be if it is defined, and the Human Design system actually doesn’t explain why each colour is used for each Center.
But when it comes to the lines or channels connecting the Centers, if any of these are defined, they will either be black or red (or both), and this shows that the line has been defined or activated by a planet from either the list of data on the left side of your BodyGraph (which is red), the list of data on the right side of your BodyGraph (which is black), or from both sets of data.
As you may know from this article where I go into more detail, every Human Design chart illustrates two sets of data or information that come together to create two different components or sides of your design — the body (also called the design) side, and the mind/personality side.
The body side of your chart (on the left illustrated in red) is set approximately 88 days before the moment of your birth and shows you the nature of your body and what’s going on in your physical form below your conscious state of mental awareness. This layer is your genetic programming and represents your bloodline and the genetics that you got from your parents and ancestors.
The body side of your design can not be consciously accessed or controlled by your mind, and so it can come as a surprise to you when it shows itself. Other people can often see the characteristics of your unconscious design more clearly and easily than you do, but with experience, self-inquiry, and self-reflection, you can come to know the unconscious layer of your design — you just can’t really control it.
The mind/personality side of your chart (on the right illustrated in black) is created by what is called your “personality crystal” (or soul) and the stream of neutrinos that were present at the exact time and place of your of your birth (when your body fully exited your mother). The mind/personality side of your design is who you think you are — it’s the information that you are mentally consciously aware of and the information that you can easily identify with.
Both sides of your design (your body, and your mind/personality) are intelligent in their own way, but since you are mentally conscious of the mind/personality, it is the side that you probably pay more attention to and it’s probably the side that you listen to, unless you are in the practice of purposely attuning to your body’s awareness.
On your Human Design BodyGraph, the lines (Gates and Channels) that are defined in the body component of your design are shown as coloured in red, and the lines (Gates and Channels) that are defined or activated in the mind/personality component of your design are shown as coloured in black. Gates and channels that are defined in both the body and mind/personality parts of your design are coloured in with both red and black.
The relationship between the body and mind/personality components of your design is interesting because the conscious side thinks it’s in charge of your life, when really, it’s the unconscious body side (working with your Prime Magnetic Monopole) that is actually in charge of moving you through your life. The mind/personality side of your design is unaware of the body side, so the key to accessing your form’s intelligence, hearing your body’s wisdom, and letting it guide you, is to follow your Strategy and your Inner Authority. To learn more about living according to your true design by using your Strategy and Inner Authority, check out this article.
Okay, back to the Human Design chart…
The Shapes (Centers)
As I mentioned in the chart overview, the nine shapes that you see on your BodyGraph are called Centers. Each Center has themes or types of energy/information that it deals with.
There are five types or categories of Centers, and each of the shapes you see on your BodyGraph belongs to one or more of these categories. There is one manifesting Center, two pressure Centers, three awareness Centers, four motor Centers, and one identity Center.
How you experience the energy of each Center changes depending if it is defined (coloured in) or undefined/open (white or blank) in your chart, and the Centers that you have determine your Energy Type, Strategy, and Inner Authority which are the three most important things to know about when you start your Human Design experiment.
The 9 Centers are: Head, Ajna, Throat, G, Heart, Solar Plexus, Sacral, Splenic, and Root. To learn more about each Center and the energy/information that each one receives, generates, circulates, and radiates, see this article.
The Lines & Numbers (Gates, Channels, and Circuits)
The numbers that you see in the shapes on your BodyGraph and the lines that extend out from the numbers are called Gates, and a Channel is where two Gates join together to make a full line between two Centers. Like the Centers, Gates and Channels have certain themes or types of energy that they deal with, receive, and radiate, and each gate can either be defined or undefined, depending on your design.
Gates allow energy to enter and exit your Centers, and Channels allow the flow of energy throughout your BodyGraph, enabling the Centers to move different types of energy/information and communicate with each other.
Gates and Channels also make up what are referred to as Circuits. There are three different circuits: the Integration Circuit, the Individual Circuit, the Collective Circuit, and the Tribal Circuit. Each Gate and Channel is part of one of those Circuits, and the type of energy that each Gate and Channel contains and circulates corresponds to the Circuit that it is a part of.
How you experience the energy of each Gate or Channel changes depending if it is defined (coloured in) or undefined/open (white or blank) in your chart.
The gates that you have defined in your Human Design chart determine your Human Design Profile and Incarnation Cross. Your Profile is the role you are here to play, and your Incarnation Cross tells you about your purpose and reason for incarnating in this lifetime. Your Incarnation Cross tends to take some lived experience, contemplation, and self-reflection to fully make sense, but the cool thing is, you don’t have to consciously understand your Incarnation Cross — if you follow your Strategy and Inner Authority, you will just naturally live out your purpose. Read more about living your design here.
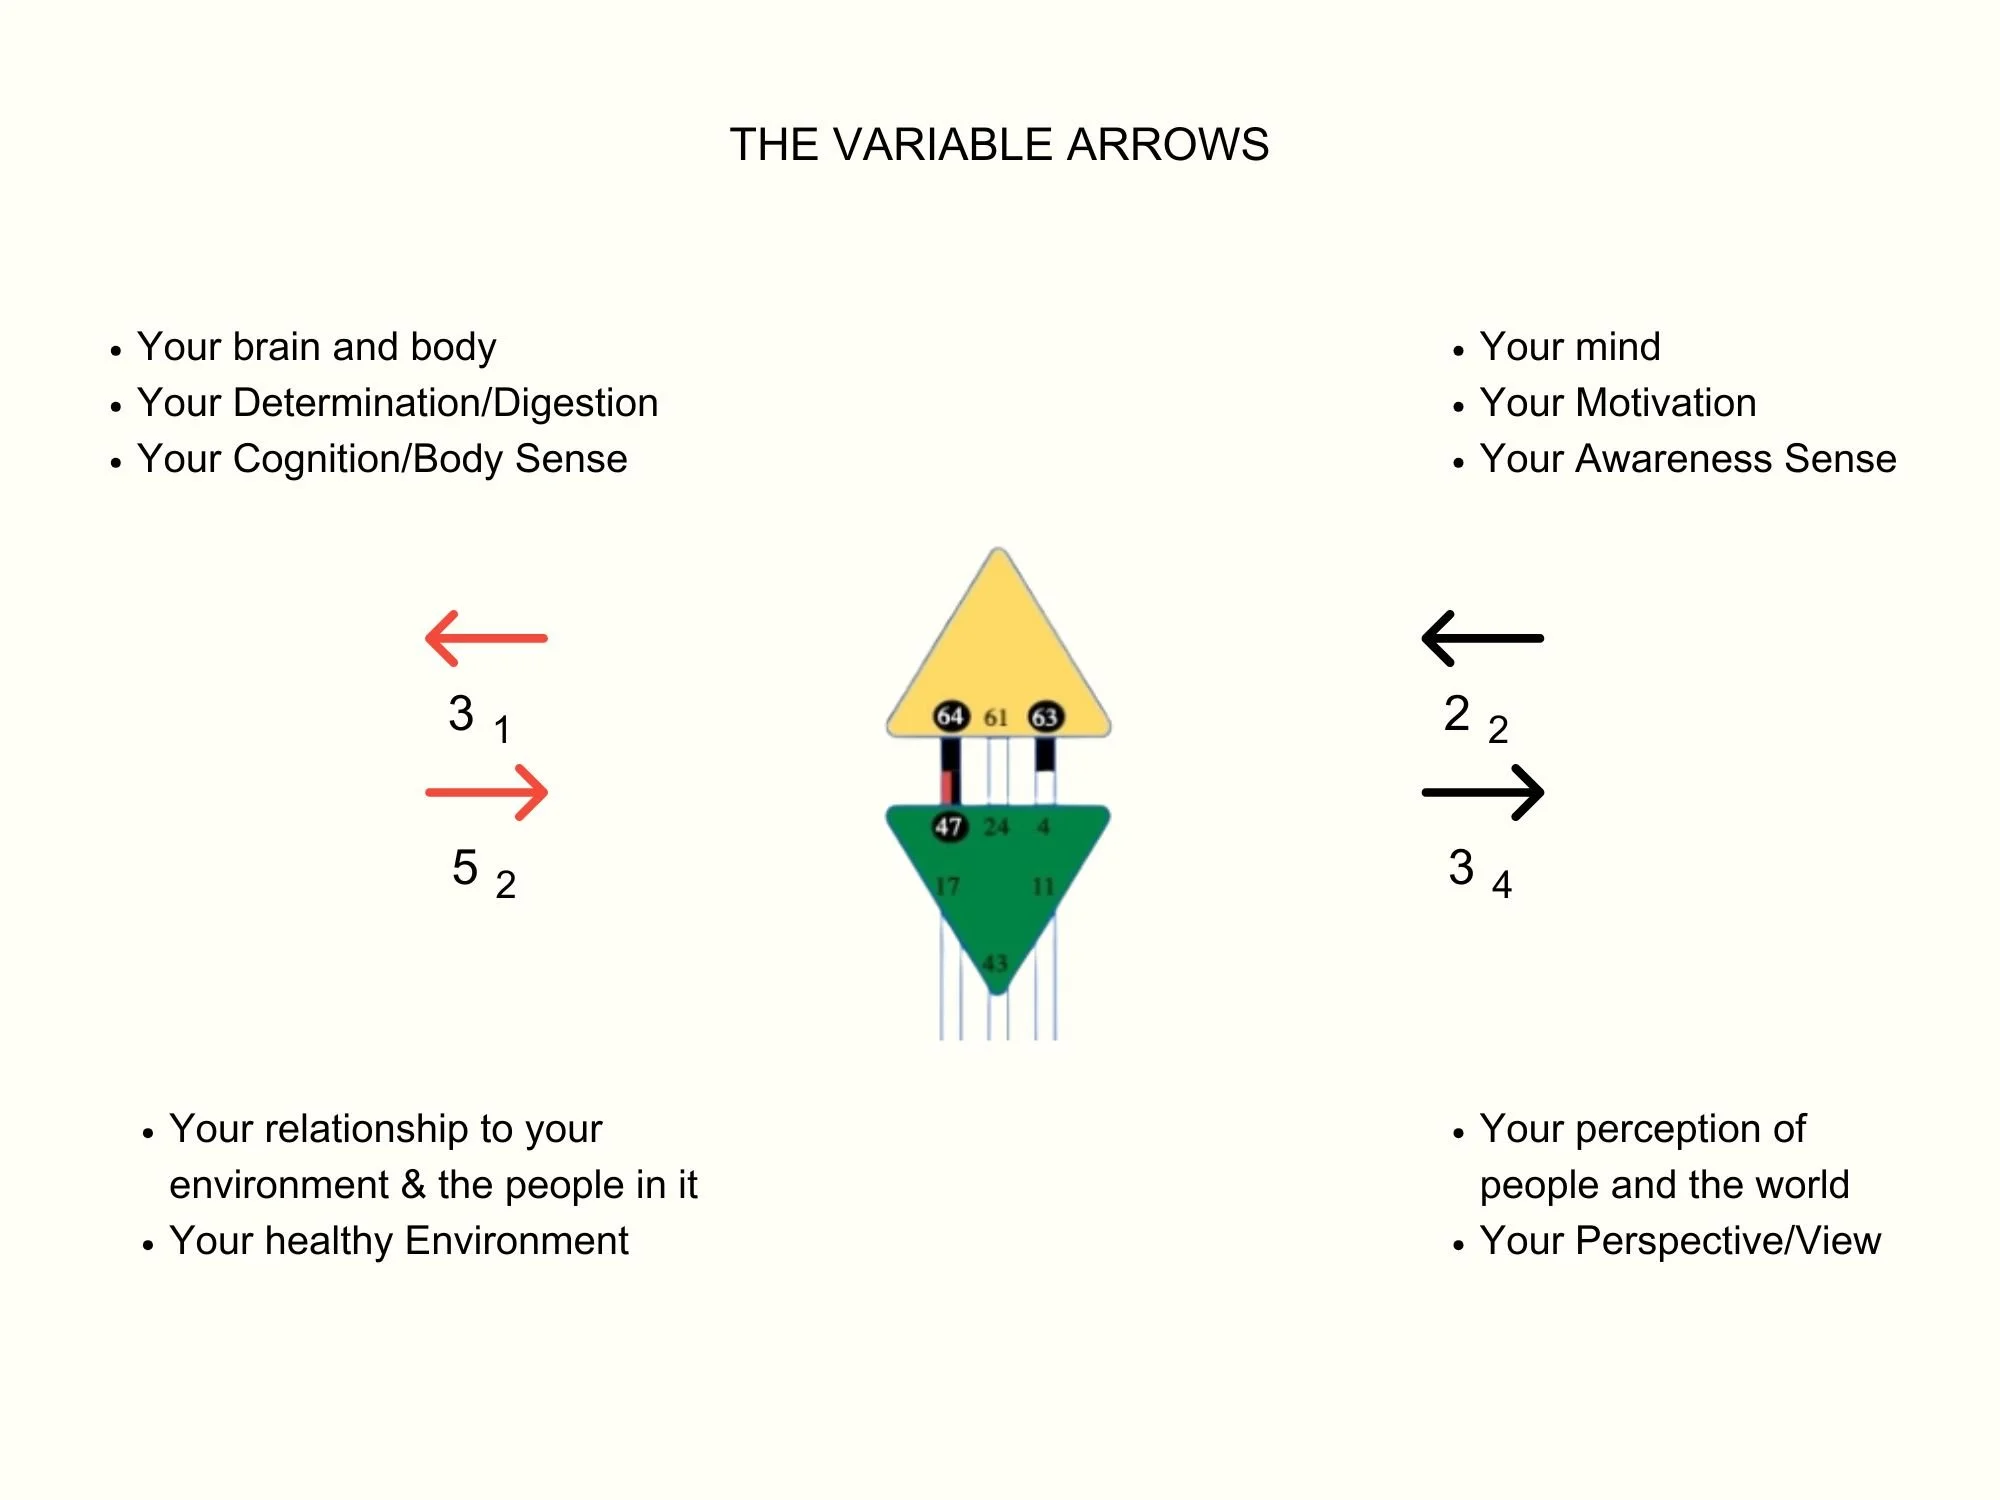
Variable Arrows
Variables are considered to be a more advanced area of Human Design, so it’s recommended that you get very familiar and comfortable with your Energy Type, Strategy, Authority, and even Profile before diving too deep into the variables. The variables are super interesting though, so I’ll give you a general overview of each arrow, and when you are ready to experiment with them, the recommended flow is to start with the top left arrow, and then go to the bottom left, and then bottom right, and then top right.
Okay, so basically, the four variable arrows that are found at the top of the BodyGraph show us how we are designed to take in, experience, process, and filter things (like food, information, energy from people, sensory data, etc). Each of the arrows on your chart will either be pointing left or right, and the “rightness” or “leftness” of each variable gives a general overlayer to it. Left-pointing arrows show us where we are designed to be more active, strategic, focused, planning, analytical, and goal-oriented. Right-pointing arrows show us where we are designed to be more passive, receptive, peripheral, intuitive, imaginative, and open-minded. It is important to note that neither left nor right is better than the other (despite what societal programming may have taught us).
The direction of each arrow is determined by the combination of what is called Colour and Tone. Colours and Tones are the deeper layers of each variable and are indicated by the little numbers that can be seen beside the arrows (if you have generated your chart on my website, you will see them). When you look at the list of information below your BodyGraph on my website, there is some Colour and Tone information listed there, and they are listed as Determination/Digestion, Cognition (or what I like to call Body Sense), Environment, Perspective, Motivation, and Sense (which I like to call Awareness Sense). There is actually one more, deepest layer called Base, but I’m not going to get into that here.
At this point you’re probably wondering what each of the four arrows tells you about your design, so here is a general overview of them:
Remember in the Red & Black section of this article when we talked about the body side of your design and the mind/personality side? Well the two arrows on the left side of your BodyGraph come from the body side of your design, and show you how your brain and body are created to get proper internal and external nourishment through your correct dietary regimen and environment, and the two arrows on the right side of your BodyGraph come from the mind/personality side of your design and deal with the nature of your mind, awareness, and cognitive potential.
For more specific information about each of the 4 Variable arrows and what each one tells you about your design, see this article.
:) Steph
Disclaimer and Source Notes
-
The Human Design System by Ra Uru Hu
From The Book of Letters: A Guide to Human Design Analysis Based on the Human Design System by Ra Uru Hu
The Science of Differentiation: The Definitive Book of Human Design By Ra Uru Hu & Lynda Brunell
Rave Cosmology III: Dying, Death, and the Bardo Stages by Ra Uru Hu
Rave Cosmology VIII: Mystic Monologues by Ra Uru Hu
Rave Cosmology V: Brahma's Night and Beyond by Ra Uru Hu
Living your Design: A New Manual for Awakening by Ra Uru Hu, revised & edited by Richard Rudd
Living your Design: A Manual for Cellular Transformation, Instructor Manual by: Lynda Bunnell
https://www.jovianarchive.com/Products/377/A_Look_at_the_Rave
https://www.jovianarchive.com/Stories/10/Introduction_to_the_Human_Design_System
Where to next?

About the Author
Hi, I’m Steph — brand & website designer and founder of The Tenth House. I also identify as a resource creator, writer, philosopher, artist, mystic, mother, and queer person. I created The Tenth House to serve as a supportive space where you can access services and resources that help you quiet the noise, connect with your Self, conduct inner research, and create effective brands & websites, and the work I do here is motivated by a desire to help people cultivate self-awareness, embrace their uniqueness, express themselves, and expand into their infinite potential through business and entrepreneurship. [ learn more ]